A Deep dive into DevOps #6
how github runners works and schedule your workflow file to triggering on the specified time ⌚

a developer contributing in open source and really interested in learning DevOps and cloud native technologies. Learner for life
How GitHub Runner Servers Work for GitHub Actions?
GitHub Actions is a powerful platform for automating software workflows, enabling developers to build, test, and deploy their applications from GitHub repositories. One of the core components of GitHub Actions is the runner server, which is responsible for executing workflows on behalf of a repository. In this article, we will discuss how GitHub runner servers work for GitHub Actions.
Runner Server Architecture

GitHub runner servers are either self-hosted virtual machines or physical servers that run on Windows, Linux, or macOS. They are used to execute the workflows defined in a repository's Actions configuration file. Runner servers can be hosted on a local machine, on-premises infrastructure, or in the cloud. The GitHub platform automatically provisions and deallocates virtual machines as necessary, based on the configured runners for the organization.
When a workflow is initiated, the GitHub Actions platform identifies the runner servers that match the hardware and operating system requirements for the workflow. If no matching runners are available, the platform will create cloud-hosted virtual machines to execute the workflow. Each runner server is associated with one or more repositories and is responsible for executing workflows for those repositories.
Runner Server Registration
To use a self-hosted runner, you must first register the runner with your GitHub repository. Runner registration involves downloading the GitHub Actions Runner application and installing it on your machine. Once the runner is installed, it must be configured to communicate with the appropriate repository. GitHub Actions provides a simple command to configure and register the runner. The command prompts you to provide details such as the runner name, access token, and repository information. Once the command is executed, the runner will connect to the repository, authenticate itself, and listen for workflow events.
When a workflow is initiated, GitHub Actions sends a message to the runner server, indicating the repository and the workflow to be executed. The runner server then pulls the workflow configuration, including the jobs and steps to be executed, from the repository. The runner server then executes the workflow on the machine where it is running.
Workflow Execution
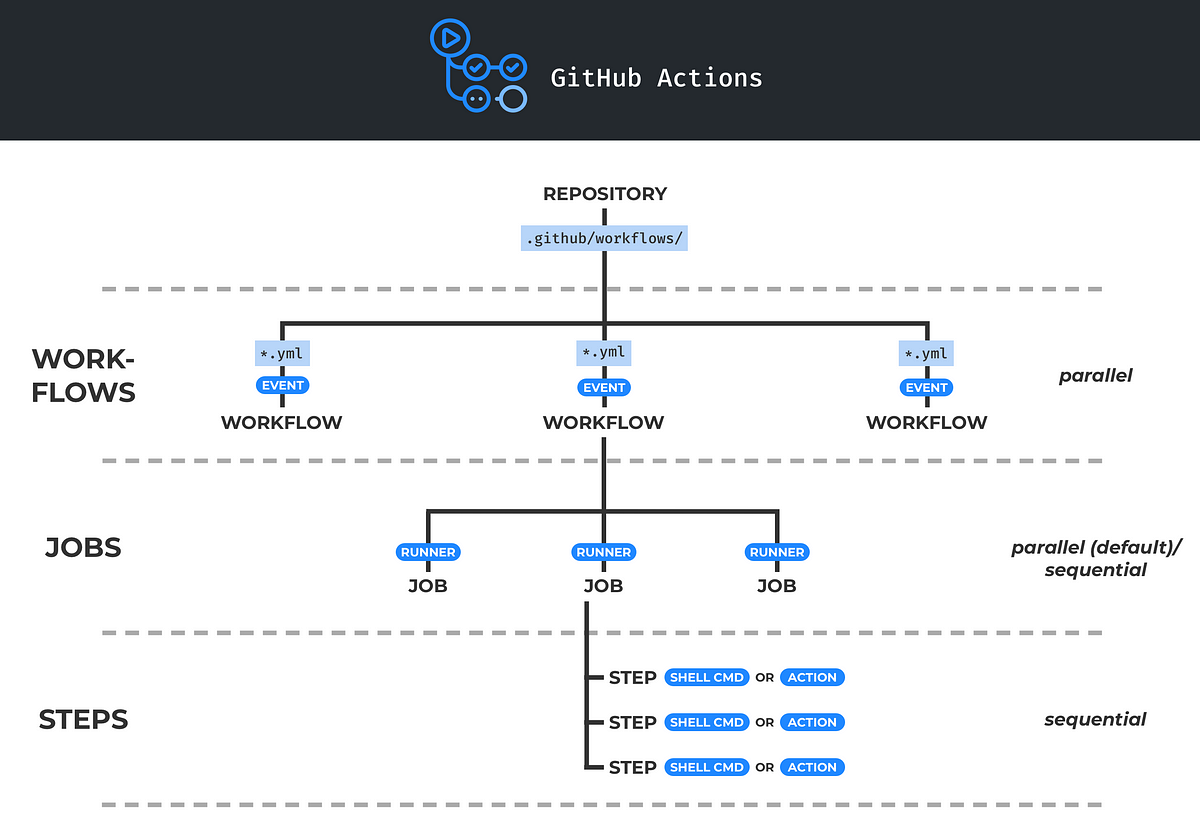
Once the runner server has pulled down the workflow configuration and any required files, it begins executing the workflow. The runner server is responsible for running the jobs defined in the workflow, one at a time. For each job, the runner server executes each step in the sequence. As each step is executed, the results are captured and sent back to the GitHub Actions platform.
If a job fails, the remaining jobs are not executed, and the workflow is marked as failed. If all jobs succeed, the workflow is marked as successful. The results of the workflow execution can be accessed through the GitHub Actions console on the GitHub website.
All about cron syntax.. 🔍
Cron is a tool commonly used in Unix-based systems to schedule and automate recurring tasks. It allows you to specify a precise time and date for a command or script to run regularly, without manual intervention. Cron syntax can appear daunting at first, but it is relatively simple once you understand its structure.
Cron Syntax Overview
The syntax for a Cron schedule is composed of five fields: minute, hour, day of the month, month, and day of the week. Each field is separated by a space, and each field can contain multiple values, designated by a comma (,). You can also use the wildcard symbol (*) to indicate all possible values for a given field.
The order of the fields is as follows:
*     *     *     *     *
-     -     -     -     -
|     |     |     |     |
|     |     |     |     +----- day of the week (0 - 6) (Sunday=0)
|     |     |     +------- month (1 - 12)
|     |     +--------- day of the month (1 - 31)
|     +----------- hour (0 - 23)
+------------- minute (0 - 59)
Here is a brief explanation of each field:
Minute: Specifies the minute(s) of the hour that the task will execute. Allowed values are from 0 to 59.
Hour: Specifies the hour(s) of the day that the task will execute. Allowed values are from 0 to 23.
Day of the Month: Specifies the day(s) of the month that the task will execute. Allowed values are from 1 to 31.
Month: Specifies the month(s) of the year that the task will execute. Allowed values are from 1 to 12, or their respective English abbreviations - Jan, Feb, Mar, Apr, May, Jun, Jul, Aug, Sep, Oct, Nov, Dec.
Day of the Week: Specifies the weekdays(s) that the task will execute. Allowed values are from 0 to 6, or their respective English abbreviations - Sun, Mon, Tue, Wed, Thu, Fri, Sat.
In addition to specific values, there are a few shortcuts that can be used to specify ranges of values:
-: Denotes a range of values. For example,10-20in theDay of the Monthfield specifies every day from the 10th to the 20th of the month./: Specifies increments. For example,*/5in theMinutefield would mean every 5 minutes.
Examples
Here are some examples of the Cron syntax:
0 * * * *: Runs the specified command/script every hour at the minute0.0 12 * * Mon: Runs the specified command/script every Monday at 12:00 pm.0 13,16 * * *: Runs the specified command/script at 1:00 pm and 4:00 pm every day.30 8 1-10 * *: Runs the specified command/script at 8:30 am every day from the 1st to the 10th of the month.0,20,40 */2 * * *: Runs the specified command/script every 2 hours at a minute0,20, and40.0 22 * * 1-5: Runs the specified command/script every weekday at 10:00 pm.
An Example of how you can schedule your workflows that will be triggered on particular time :-
name: My Scheduled Workflow
on:
  schedule:
    - cron: '0 0 * * *' # Run at midnight every day
jobs:
  my-job:
    runs-on: ubuntu-latest
    steps:
      - name: My Step
        run: echo "Hello world!"
In this example:
The workflow is named "My Scheduled Workflow".
The workflow is triggered on a schedule using Cron syntax.
The schedule is set to trigger at midnight every day (
'0 0 * * *').There is one job named "my-job".
The job runs on the latest version of the Ubuntu operating system (
ubuntu-latest).There is one step named "My Step" that simply echoes "Hello world!".
You can modify this workflow file to include your specific commands or scripts that you want to run on a scheduled basis. Just replace the "My Step" with your own steps, and adjust the Cron schedule to fit your needs.
I know it's too much informative only but as I have promised I have to come up with this one 🙂
but don't worry keeping this to this much only 🚀
If you are enjoying the dive make sure you react and follow if you haven't because in you might lost your way 🤿


